I have started programming with widget blueprints. This is my main mechanic, which is currently not working, but I am figuring it out!
I have started programming with widget blueprints. This is my main mechanic, which is currently not working, but I am figuring it out!
3/7-3/31 (1h a day & a week break)
Going through the blueprint tutorial, I wanted to take some notes to help me learn and possibly share with others trying to learn the visual scripting in the Unreal 4 Engine.
Line Color Coordination:
Box Color Coordination:
The order of events is determined by the event leading into functions, which can be continued to other functions to be in a sequenced order- this is sequential firing. Two events can be plugged into a function as well, but requires only one to happen at a time; for example, a person entering a trigger box turns on a light while leaving it will turn that same light off.
Level Editor Blueprints stay contained within that level. Class blueprints can be used over multiple levels and work the same.
In the Class Editor you can change the root by dragging the item in the component browser over the white root.
Copy and paste works with nodes!
Get Reference to reference them (a variable to plug into a function). Set Reference can change the referenced object.
When the target is “self,” it means the blueprint that is being worked on.
Group nodes with comments by selecting the nodes and pressing the “C” button. Left clicking on the comment and drag can move everything within it around. The text and color is editable as well. Personalize it 😉
The event graph edits every blueprint in-game. The construction script is to update the most recent changes to the blueprint.
In the color picker, you can left click and drag the color onto the color bar to save it!
Make object variables by clicking the edible button so you can edit inside the level editor.
An alternate way to make a class blueprint is by creating an empty actor and adding components through the level editor. Then hit the blueprint button and you got a new blueprint!
Another way to make a class blueprint is to select objects in the scene, click the blueprint drop down menu at the top and select “Convert Selected components to Blueprint Class…” But level blueprint still not follow.
As an update, this is one of the screenshots of my game so far. Currently the game is only made of UI widgets of transitioning menus. The basic mechanic is not made yet, but it’s good to see the basic UI of one of the more developed screens.
As for learning how to code the mechanic I need, I am following this basic blueprint tutorial series to hopefully figure out what I need.
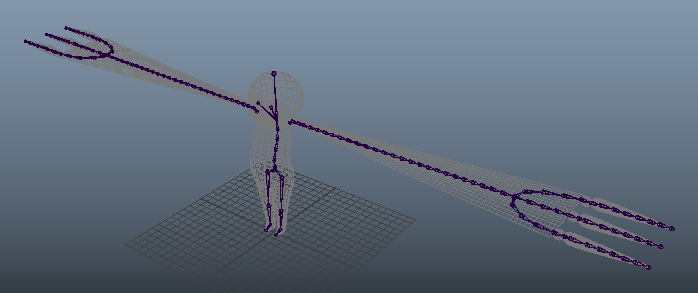
All puns aside, I spend all day working on making the skeleton. Luckily I saved a lot of time using some tools from this site, so check them out anytime you don’t wanna fuss over joint orienting or manually rename every little bone in the skeleton.
Spend a day on UV Mapping because it was not as easy as I remembered it to be… Such a tedious task to move around UVs and get everything prepped for textures. Not to mention accidentally messing up and having to go back and redo everything that was just done.
On the bright side I am super proud of my boy’s eyes! Just look at the beautiful boy!


To address the probable questions to the topology of my model, the clothes are low-poly because I am wanting that rough/edgy look to it, where the face and scarf will have more detail of movement there.

With RATions to the back-burner after some group issues, I am going to be working on programming for a new game.
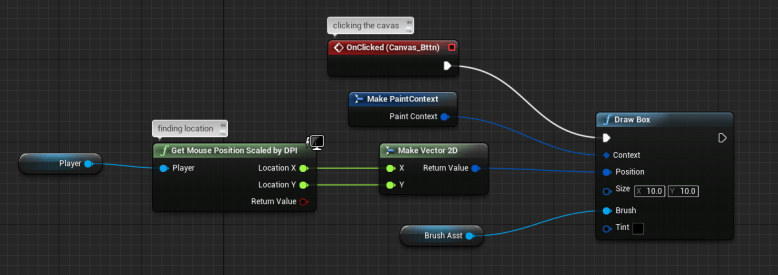
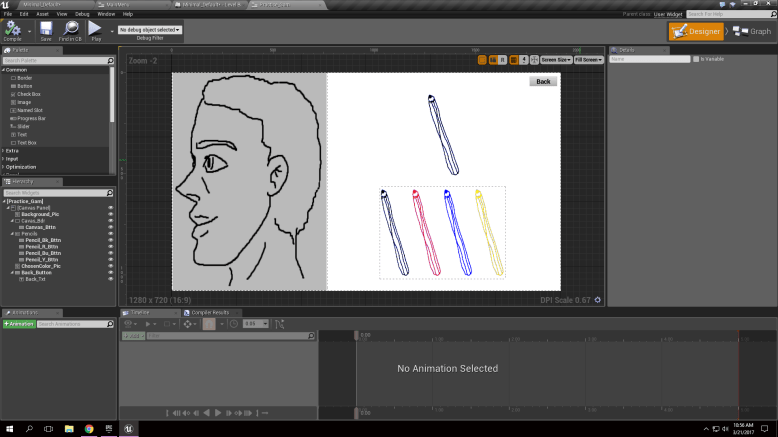
For a start, I am working on a simple clicker game that teaches the player what pointillism is. There is a basic mechanic of when the player clicks, it creates a dot on the canvas and have different colors to choose from.
A sketch of the basic layout and added extra ideas: From this I have come to not consider spray paint, sponges, or art rags as apart of pointillism as they provide too wide of a range compared to a single dot of a pen. What I am going to include is a practice area to have overlying outlines for the player to fill.
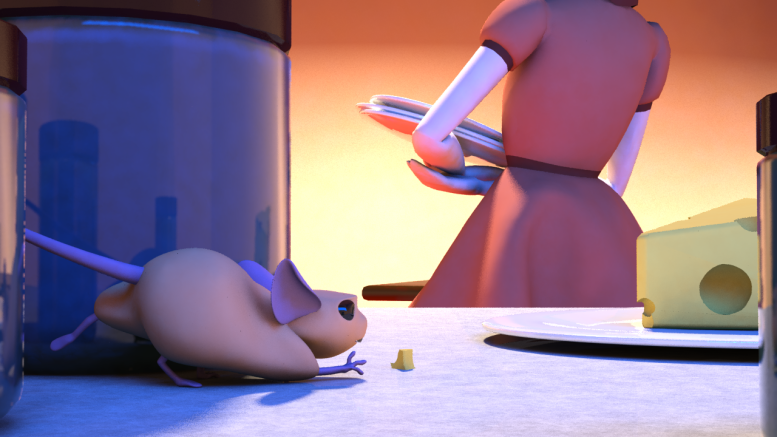
So after competition I took the given critique and have started modifications to making the picture better than before by exaggerating the mouse pose, making the cheese more recognizable, and putting Ma closer to not have her distract from the Mouse.
Sadly there has been a problem that has come up preventing me from working as efficiently. Maya has decided I can only make one render per opening where she otherwise crashes if one tries to make a second. This has caused me to change my workflow to opening my project in Maya, render the previous save, and save any modifications from that before starting the process over and over and over again. Not sure on how to fix this problem, but I will look into it when back at the rendering station.
Hey, new project!


This is Rutendo, a child with a magical scarf that act as his arms.
So our group agreed on renaming our game “Don’t Tread On Me” to “RATions,” so I made a logo for it:
![]()
![]()

Here is the turn-in for district competition 🙂
